DIY Modern Industrial Coffee Table
We have been looking for a coffee table for over a year now! I wanted a large statement piece for our living room and this DIY Modern Industrial Coffee Table was the perfect piece. Its simple design with a modern industrial flare was the perfect fit for our living room.
Building your Modern Industrial Coffee Table:
STEP 1 : Measure the height of your couch before you cut and build! I made the mistake of building the entire coffee table before paint and stain. Luckily, I brought it in to see how it looked in the space and it was 2.5″ too tall for my couches. We have very low couches that I didn’t take into account when I first started building. (Project called for 17-1/4″ height and I cut mine to 15-1/8″.
STEP 2 : Measure twice, cut once! Cut all boards as shown on the cut list below. Make sure you cut each board at a time and measure each before cutting. (IMAGE IS NOT TO SCALE)
If you are unfamiliar with a tape measure, please use this as a guide below!
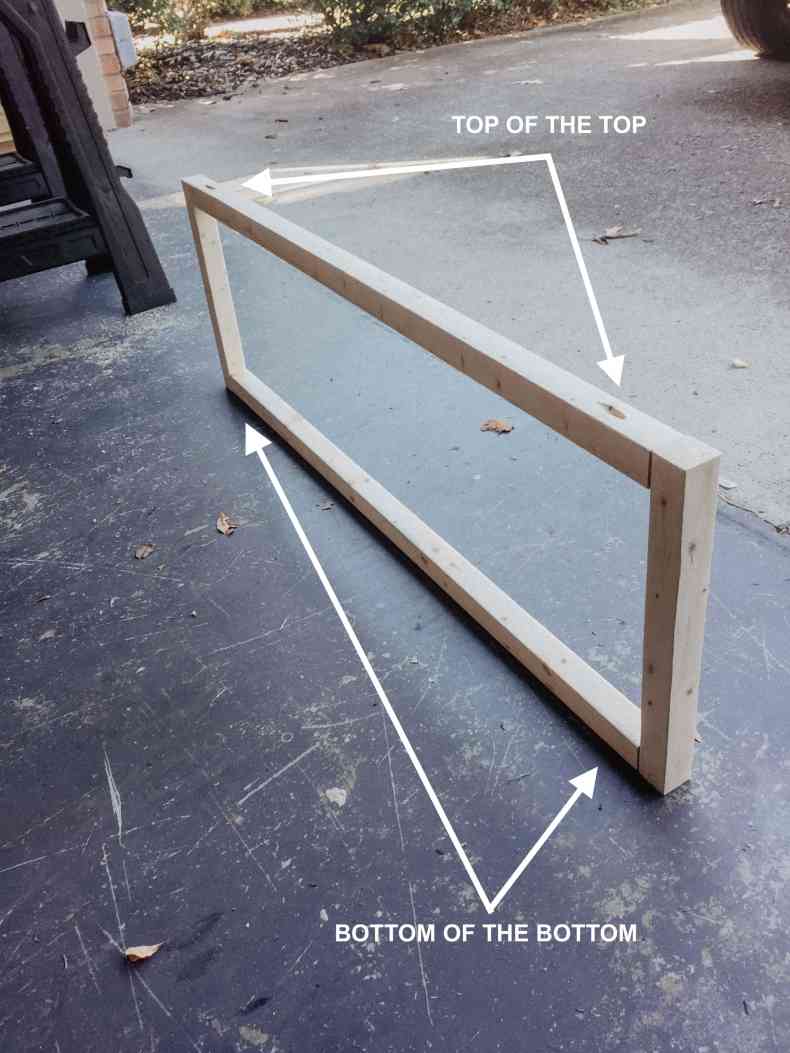
STEP 3 : Drill 1-1/2″ pocket holes on each end of all longer 2 x 2 boards (9 Boards Total – 16 pocket holes). Attach with 2-1/2″ pocket hole screws. Place pocket holes on the top of the top (to be covered by the top piece of the coffee table) and bottom of the bottom.
I used a Kreg Jig and clamp to drill the pocket holes. I don’t have a work bench so I used the boards for the top of the coffee table and a few saw horses to brace the clamp.
STEP 4 : Build two of the leg frames. You should have 2 pieces that look like this below.
STEP 5 : Next, attach 2 of the 44-15/16″ long boards to the leg frames – again hiding pocket holes on the top and the bottom. Attached the remains 43-1/4″ board to the center to help brace the weight of the top of the coffee table.
STEP 7 : Attach remaining 2 – 44-15/16″ boards to the leg frame – again, hiding the pocket holes on the top and bottom.
STEP 8 : Flip over the assembled piece on top of the other leg frame and screw together.
When you’re finished you should be left with this.
STEP 9 : Spray paint your coffee table base! Make sure you have sanded down before painting. For tips on Sanding and staining check out my DIY Open Shelving post.
STEP 10 : While your coffee table base is drying, stain your coffee table top. I chose to stain before assembling the entire coffee table together. For the coffee table I used that same staining technique and colors I used for my DIY Wood Framed Mirror.
Start with driftwood, willow, and provincial. Wipe off almost all of the provincial when you put it on with the cloth so you get a very light wood color for the finish. Follow the directions for Polycrylic on the can.
(Left is Driftwood and Willow, Right is after Provincial)
STEP 11 : Assemble your coffee table top and attach to base. The coffee table top can be assembled two different ways:
A) You can lay all the boards together on a flat surface and flip the coffee table base over on top of your boards and screw 2″ screws through the 2 x 2’s into the loose boards. (Ana White’s preferred way)

B) Use a Kreg Jig and drill 4 – 3/4″ holes on the bottom of all your 48″ boards (Labeled with an X in the photo). Lay boards on a flat surface and use 1-1/4″ screws screw them together. Use a clamp to hold boards together while you assemble – *TRICK if you don’t have clamps you can use ratchet tie downs to hold together. (Kourtni’s preferred way)
STEP 12 : If you chose to assemble using “B.” Lay your coffee table top on a flat surface and use the 2″ screws to screw through the 2 x 2 base into the coffee table top. As seen in STEP 11 : A.
My coffee table design was inspired by Ana White and House Seven Design.
STEP 13 : Clean and style for your living area 😉
SHOPPING LIST :
3 – 1 x 10 @ 8 feet long
6 – 2 x 2 @ 8 feet long
50 – 2-1/2″ pocket hole screws
16 – 1-1/4″ pocket hole screws
30 – 2″ wood screws
Minwax Polycrylic (Water Based) – Clear Satin Finish
Paint Brush for Water Based Paint
Rust-Oleum Satin Black Spray Paint
TOOLS :
Tape Measure
Pencil
Safety Glasses
Ear Protection
Mask
Drill
Circular Saw (or Miter Saw)
Sander (or Sanding Sponge)
CUT LIST :
5 – 1 x 10 @ 48″
4 – 2 x 2 @ 15-1/8″
5 – 2 x 2 @ 43-1/4″
4 – 2 x 2 @ 44-15/16″
SKILL LEVEL :
Beginner / Intermediate
PROJECT COST:
$50
Be sure to tag me in your pictures on instagram with your finished project, Happy Table Making Friends!
SaveSave
SaveSave


What kind of wood did you use?
Hi Ashley,
I used pine common boards!