
This post is sponsored by The Home Depot. All opinions are 100% my own. Thank you for supporting the brands we truly love!
We’ve been trying to figure out what to do with this odd little corner off our kitchen for the past few years since we moved into our home in 2016. Cody kept throwing the idea around of doing a wet bar or a DIY dry bar. I was into it, so I thought… how do I even build a DIY dry bar?!

Well, if you’ve got the same question – I’m here to tackle the answer with ya! We’re going to build a DIY dry bar step by step and turn a miscellaneous nook into the best addition to your kitchen or basement for entertaining!
In November, we created a little makeshift dry bar for a Casual Friendsgiving using a StyleWell Kitchen Island/Bar Cart and it turned into my inspiration to create a built-in cabinet dry bar. So, I’ve partnered with Home Depot to share the ins and outs of choosing cabinets and the best paint for cabinets, wall features and floating shelves!

What supplies do I need to build a DIY Dry Bar?
- BEHR Kitchen, Bath & Trim Stain-Blocking Primer and Sealer or BEHR Cabinet and Trim Enamel
- BEHR Marquee – Satin Black #PPU26-01
- 4” Foam Roller
- 5” Paint Brush
- Orbital Sander or Sanding Sponge
- 180G and 220G Sandpaper
- Mini Disposable Cups or Paint Pyramids for holding up doors
- Unbranded Oak Butcher Block Countertop
- Hampton Bay Kitchen Cabinet Base Assembled 24”
- Hampton Bay Kitchen Cabinet Base Assembled 21”
- Hampton Bay Toe Kick
- Wood Contractor Shims
- Kapro 36” I-Beam and Plumb Site Level
- DeWalt Cordless Power Drill
- HDX Painters Plastic Sheeting
How to Build a DIY Dry Bar
Step 1: To Build or Buy Cabinets
The biggest question you’ll have to ask yourself is if you should be building cabinets or purchasing pre-made cabinets for a DIY Dry Bar. Building cabinets takes some fines, and if you’ve never built them and want to save some time, buying cabinets will be your go to! You can never go wrong with building your own cabinets, but we needed raised panel doors and purchasing pre-made cabinets was easier for me in this project.
If you want to check out our kitchen remodel you can find here!

I opted for the Hampton Bay Kitchen Cabinet Base Assembled in-stock cabinets at Home Depot. I decided to order on-line and shipped to my local Home Depot store instead of having them shipped to my home. Why you ask? Well, I was able to bypass the delivery surcharge AND they were available for pick-up 1-3 days after I ordered them on-line. If you’ve ever been to the Kitchen & Bath Department at Home Depot you know it can be a bit daunting finding your exact size cabinets. So ordering on-line and picking up in-store with a friends truck was the perfect combination for me!
In-stock cabinets are almost always made up of particle board/MDF and the cabinet fronts are solid wood. Since I was painting the cabinets, the color and material of the cabinets was not a huge deal breaker for me.
If you are wanting solid wood cabinets, they will be a custom cabinet order which takes 4-6 weeks, so be sure you allow for that time in your project!
Step 2: How to Choose Your Cabinet Paint
When it comes to choosing cabinet paint, you can’t just grab the first thing you see off the shelf. There are specific paints to use for painting cabinets! Cabinets are high traffic pieces that need paint that won’t chip and wear well. Cue, BEHR Kitchen, Bath & Trim Stain-Blocking Primer and Sealer.

This is the primer I used it before painting the cabinets my finishing color. BEHR just recently came out with BEHR Cabinet and Trim Enamel which is specifically formulated for use on cabinets. However, my cabinets are Satin finish in our kitchen, and I wanted to continue the same sheen and the new enamel paint is currently only in semi-gloss.
Step 3: Choosing Your Painting Supplies
There are a couple different ways to paint cabinets. The easiest way is to use a paint sprayer – you’ll get the most professional finish and save the most time. Sometimes the space you’re painting the cabinets in is not the most ideal space to spray cabinets. The juice isn’t worth the squeeze!
The second way to paint cabinets is with a sponge roller and paint brush. This is how I decided to paint my cabinets. The sponge roller hides brush strokes and gives you the most even finish. Since you’ll be sanding and painting off and on, you’ll want to have some aluminum foil on hand to wrap your brush and roller to prevent them from drying out. You won’t have to wash your brush and roller in between each use by wrapping them in foil.
Step 4: Installing Your Dry Bar Cabinets
Before cabinet installation, bring in your cabinets and countertop to acclimate to your space for a few days. To install cabinets your space needs to be level, so you’ll need wood contractor shims and a 36” level. Most flooring and walls are never completely level or flat, so be prepared to use a couple shims for each cabinet.

I removed the baseboards around the cabinets to fit like a puzzle piece using a Ryobi Multi-Tool. If possible, install cabinets prior to baseboards and tile, wood or carpet flooring.

Using a stud finder, find your studs and place all your shims under and on the sides of the cabinet before securing to the wall.
Secure your cabinets into the wall by making pilot holes before screwing into place to prevent the cabinet and shims from splitting.
The number of shims you use will very based on the space you’re installing them. We installed ours on brick flooring and removed the baseboards around the cabinets to fit like a puzzle piece. If possible, install cabinets prior to tile, wood or carpet flooring.
Step 5: Prepping Your Cabinets for Paint
If you are working with cabinets you already own, you’ll need to degrease your cabinets prior to painting. Since my cabinets are new I didn’t have to use a degreaser, but if yours aren’t new I recommend using Krud Kutter.
Sand your cabinets down with a DeWalt Orbital Sander and 180G then 220G sandpaper.
I went ahead and sanded the cabinets down with 180G and then 220G sanding sponge.
**I highly recommend using an orbital sander as it’s more efficient. **
This wasn’t the case for me as I had to work on the cabinets in my home and using a sander was not an option with the area the project was in.

There should be a distinct difference between a sanded cabinet and un-sanded cabinet. The sheen will disappear once you’ve sanded them down enough. As you can see in this photo the cabinet on the left is un-sanded and the cabinet on the right is sanded and ready for paint!
After you’re done sanding down the cabinets wipe them down with a damp rag and let them dry thoroughly before applying your primer.
Step 6: Priming Your Cabinets
When sanding and painting the cabinet base, remove the drawers so you’re able to sand and paint the base and drawers easily. We didn’t paint the cabinet sides in-between the cabinets since it will not be visible when the beverage fridge and countertop is installed.

Use a brush first to tackle the ridged areas and creases, then go over the cabinet with a foam roller. Once the primer is dry, sand down with 220G sandpaper and wipe clean with a damp rag. After you’re done with the cabinet base, you can insert the drawers for ease of painting and drying.

Step 7: Painting Your Cabinets
Get ready to hate me, because you’re going to have to put on about 4 coats of paint including primer. You might get lucky an only have to do 3 coats (1 coat of primer and 2 coats of color), but it’s really up to how they look to you!
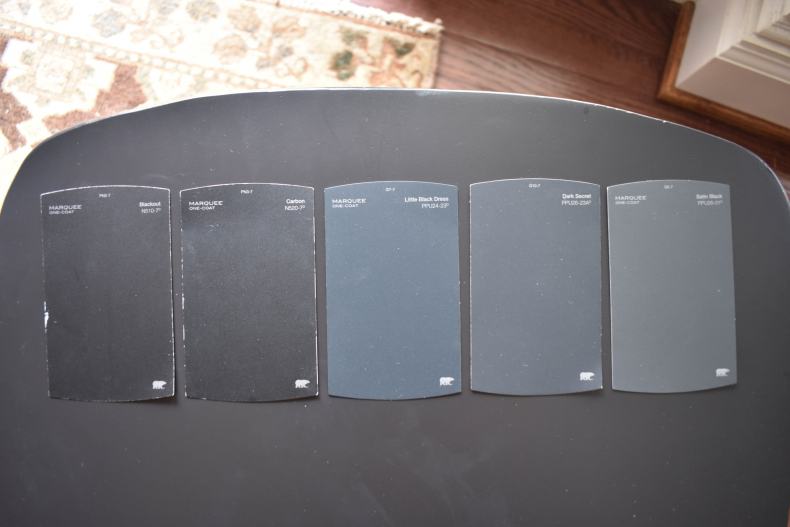
After the primer you’ll put on your first coat of color, I went with BEHR Marquee – Satin Black #PPU26-01. It was a big toss-up between a ton of other colors! Let’s just say I left Home Depot with about 5+ samples. We wanted something moody and black was too black and we have a few shades of green in our home already. So, a grey-blue is what I was going for and Satin Black by BEHR was the perfect fit! (far right)
Step 8: Installing the Dry Bar Countertop
We did things a bit backwards and put the countertop on before I finished painting. It’s easier to paint before the countertop is installed, so if possible finish painting before installing.

Be sure your countertop has the corner supports to support the countertop, if not you can purchase them separately at Home Depot. The Hampton Bay cabinets did not come with corner supports. We had a Kalamera Beverage Fridge going between the two cabinets so I installed a piece of scrap wood as a support piece against the wall for added countertop support.


I needed a countertop between 5 and 6 feet long, so I cut the Unbranded Oak Butcher Block Countertop to size using a DeWalt Circular Saw. I measured enough to give me a 1 ½ “ lip on the left side of the cabinet. After cutting the butcher block to size, I sanded down and lightly rounded the edges on the front and left side for a finished look.

After you have dry fit your countertop, run a bead of silicone under the countertop to secure. Then attach your remaining screws in the corner supports to the countertop underside.

Step 9: Installing Tongue and Groove Paneling
After installing the countertop I added the tongue and groove paneling on the entire wall to give the built-in some more character with a Ryobi Brad Nailer and ¾” brad nails (no liquid nails were used). If you don’t plan on removing the paneling, then use liquid nails! We decided not to use liquid nails and be nice to the next homeowners if they ever want to remove it.
The wall paneling was installed the same way tile backsplash is installed, right on top of the back-countertop edge that butts up against the wall. Our home was built in 1994 and it has a ton of character as far as trim and column work, so I wanted the wall paneling to feel like it was part of the home. You can also use bead board to achieve the same look with smaller panels.

Since my boards were knotty pine, I used Dap Plastic Wood Filler to fill all the holes and knots to create a smooth finish before painting. To paint the paneling I had Home Depot color match our trim color and used BEHR Interior Satin Enamel to match the cabinet sheen.

I used a 4” foam roller on all of the wall paneling and used a brush to cut in between the panels. After my first coat of paint I caulked the top, sides, bottom, door frame and anywhere that had uneven gaps. I used about 2-3 bottles of caulk for this project. When the caulk dried I added 2 more coats of paint since the caulk was a different shade of white.
Step 10: (Optional) Installing Floating Shelves over Dry Bar
Adding open shelving to your dry bar is totally optional. We had enough space for it and felt like we needed more storage, so we added floating shelving above the dry bar. Since the wall paneling blocks access to the drywall to use a stud finder I taped off where the studs hit on the butcher block countertop before installing the wall paneling. I then used blue 3M Painters Tape to find out the number of shelves and how high I wanted to hang them.

Since we already have floating shelves in the kitchen, I didn’t want them to compete with each other. So, instead of doing three shelves I went with two shelves and two sconces above the shelves. You can find the detailed floating shelf tutorial here.
Step 11: Painting Your Floating Shelves

I used the same used BEHR Interior Satin Enamel paint for the wall paneling that I did on the shelves. The shelves will not be a high traffic area, so I didn’t use cabinet primer and just used two coats of the wall panel paint since BEHR is a paint & primer in one.

Tip: Paint Curing Time for Cabinets and Shelving
After painting cabinets they take time to cure meaning they need to fully dry. To be on the safe side I left the drawers and cabinet doors open for 48 hours along with not setting anything on the shelves to ensure a long enough dry time before use. After 48 hours I attached the rubber corner guards to the interior part of the drawers and doors.
The Reveal
I know y’all have come this far, so let’s get to seeing this reveal! To refresh your memory here’s what we started with in this corner, the before.
I can’t believe this is the after, y’all. I am screaming inside because I had never worked with cabinets or countertops before and this just turned out better than I ever could have imagined.
The after, in all its glory! Who knew a few cans of paint and generic stock cabinets could look so good.

The dry bar looks like it’s been a part of our home for years and flows great with the rest of the space. I was a little skeptical about using butcher block countertop since we already have it in our laundry room. However, with the kitchen having white quartz and using the same type of wood for the DIY Dry Bar – it worked out perfectly!


A DIY dry bar is the perfect addition to any home to create a custom look on a budget!
Get the Look
- BEHR Kitchen, Bath & Trim Stain-Blocking Primer and Sealer or BEHR Cabinet and Trim Enamel
- BEHR Marquee – Black Satin #PPU26-01
- Unbranded Oak Butcher Block Countertop
- Hampton Bay Kitchen Cabinet Base Assembled 24”
- Hampton Bay Kitchen Cabinet Base Assembled 21”
- Kalamera Beverage Fridge
- Abigails Matte White Glaze Terracotta Vase
- Gibson Home 12-piece White Dinnerware Set
- Trinity 3-Piece Bamboo Canister Set
- Euro Ceramica Clear High Ball Glass Set of 4
- 4” Foam Roller
- 5” Paint Brush
- Orbital Sander or Sanding Sponge
- 180G and 220G Sandpaper
- Hampton Bay Toe Kick
- Wood Contractor Shims
- Kapro 36” I-Beam and Plumb Site Level
- DeWalt Cordless Power Drill
- HDX Painters Plastic Sheeting
- DeWalt Circular Saw
- Ryobi Multi-Tool
- DAP Alex Plus Caulk
- HDX Caulk Gun
- DAP Plastic Wood Filler
Let me know if you have any questions below in the comments about anything product wise or even remodeling questions! I’m an open book 🙂
For more behind the scenes on all of our DIY and home projects be sure to follow along on instagram. To see all of our inspo and upcoming projects be sure to follow along on pinterest.

Overall, how much would you say this cost?
Hi Taylor,
I wan’t to say it was around $900 but I’ll have to double check that for ya!
Wall paint color for adjacent wall?
Hi KK,
The adjacent color is Accessible Beige by Sherwin Williams.
Hi!!
Are the sconces wired somehow? Or are they battery?
Hi Ash!
They weren’t hard wired for this reveal of the project, and used the puck light trick to use with a remote. We have wiring there for lights that will be hardwired through the otherwise of the wall 🙂